Something I've been cooking up
Showing posts with label 3Dmodel. Show all posts
Tuesday, 23 October 2018
Wednesday, 18 July 2018
SketchUp feature
The guys over at SketchUpUK spoke to me about my use of their program in my day to day work...
Check it HERE
Check it HERE
Tuesday, 6 February 2018
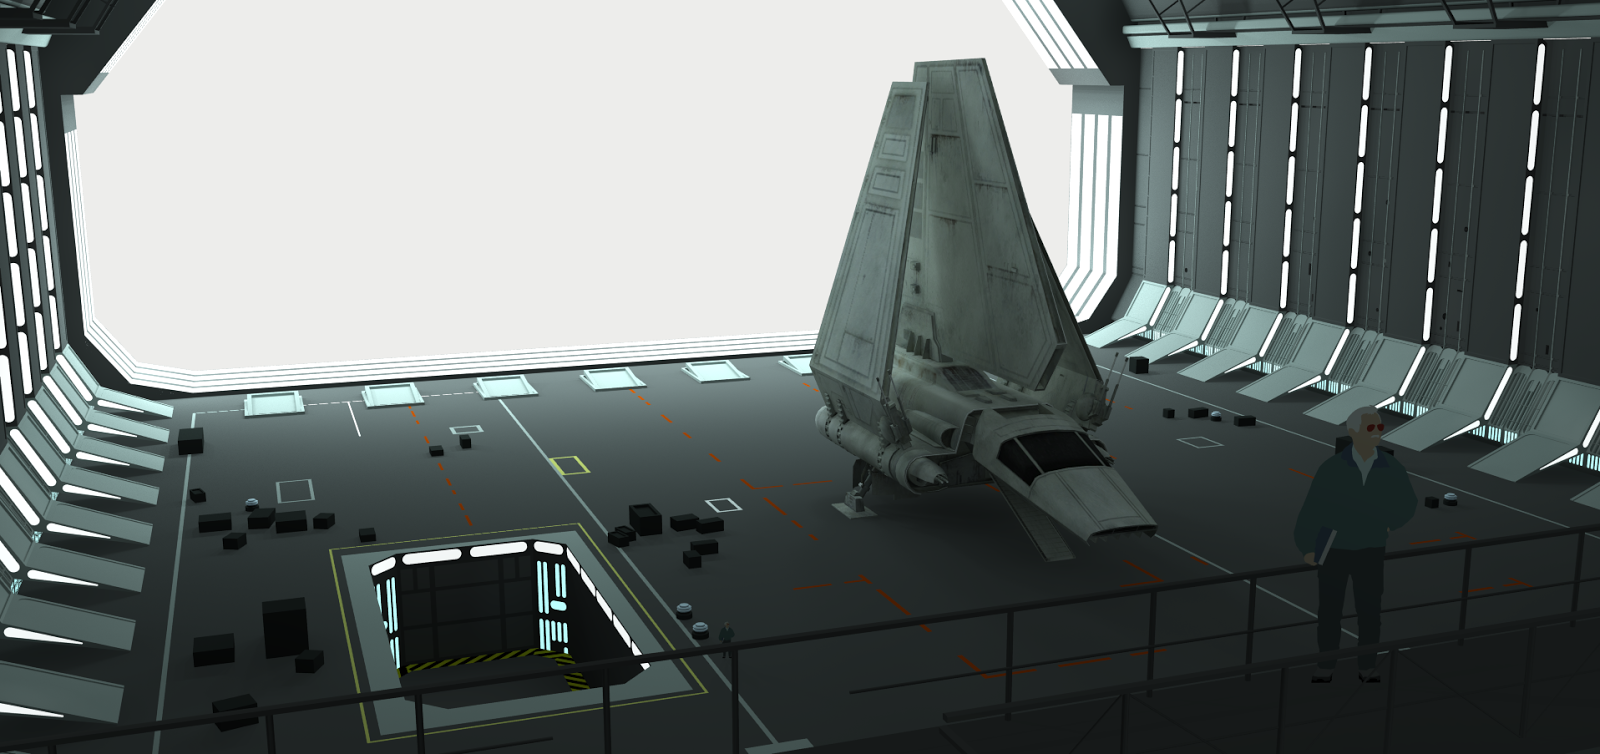
Practice/learning. Interior lighting
So between projects (and partially becase of a current project) I felt I wanted to practice more with lighting within 3D space. As digital modelling isn't quite the same as switching on a normal light bulb, I wanted to play with settings to see if I could further grasp how to recreate a 'look' for my concept art.
My fundamental inspiration came from using a recognisable film frame and rereating a set rather than simply making something up and hoping it looked right. Also the first 20minutes of a great panel discussion with John Knoll at Star Wars Celebration 2016 gave a similar, more polished example of what I was thinking of.
So as you can see below, this is my current desktop wallpaper. A Star Destroyer hangar bay from Jedi I believe...
The first thing was to match the perspective and camera view which can be done pretty effectively using MatchPhoto in SketchUp. I began by blocking out the space that was visible. No point in building outside of the camera view. Let's be cost/time effective ;)
The red highlighted area is a note that I never intended on building outside of the hangar. It would be painted or photbashed in as a background element.
The foreground gantry really sits quite far back in terms of the shot but realistically you can recognise the forground element is actually shot footage on a matte.
Detail was never the intention with this practice build. I blocked in the notable forms and of course light sources. The Imperial Shuttle (below, red), I grabbed from the SU warehouse so kudos to the person who built it. Highlighted below in yellow is a very large spot light source (I should mention I was using Podium as my rendering software). The green scribbles are omni light sources. Used to light the general area they are placed without a specific direction.
A reverse view shows the model build and lack of any detail behind the 'camera lens' (red).
A cross-section of the build shows how the entire set was encased to remove any 'outside' light that may affect the interior space.
RENDERING
So the first render was literally to see what would happen before I turned on any lights. The main source of light came from 'outside' the set before I had taken the time to box everything in as described above.
It's pretty dark at this point, so lets turn on the lights.
The huge bars of light that go around the opening I set with 'intensity' turned on but for the vertical light panels on the side and blue glow from the elevator I turned on to something like '10' to see what would happen. As you can see it's a total blow out of light. Too much from that outside spot light (something daft like '64'). All way too much but a starting point. Now to pull it back.
This was better. the vertical lights I dropped down to '6' I think and the outside spot light went down too '44' and was moved back a tad. It was at this point I realised the outside space was affecting the set as well and so I blocked it in with a black box to resemble space. Playing with lights and numbers proved helpful when I purposefully started with too much as it gave me something to work back to rather than say starting at lighting strength '1' and going up from there. It would have taken too long.
Now I'm not a 3D modeller (hence my use of SketchUp). I'm not sure I could call myself a 3D generalist either. For what I do and my process. This (half a days work so far) is enough to work with in concepting up. There is a general feel of the correct light levels beginning to come through and once brought in to Photoshop I would be able to make minor level adjustments much quicker than inside the model. Again, the idea of this test was to practice lighting a space (in this case a very large one).
With a very quick drop in of the background and a little adjustment you can see the beginnings of a set being concepted with a strong light source that is effective and realistic enough to work with...
My fundamental inspiration came from using a recognisable film frame and rereating a set rather than simply making something up and hoping it looked right. Also the first 20minutes of a great panel discussion with John Knoll at Star Wars Celebration 2016 gave a similar, more polished example of what I was thinking of.
So as you can see below, this is my current desktop wallpaper. A Star Destroyer hangar bay from Jedi I believe...
The first thing was to match the perspective and camera view which can be done pretty effectively using MatchPhoto in SketchUp. I began by blocking out the space that was visible. No point in building outside of the camera view. Let's be cost/time effective ;)
The red highlighted area is a note that I never intended on building outside of the hangar. It would be painted or photbashed in as a background element.
The foreground gantry really sits quite far back in terms of the shot but realistically you can recognise the forground element is actually shot footage on a matte.
Detail was never the intention with this practice build. I blocked in the notable forms and of course light sources. The Imperial Shuttle (below, red), I grabbed from the SU warehouse so kudos to the person who built it. Highlighted below in yellow is a very large spot light source (I should mention I was using Podium as my rendering software). The green scribbles are omni light sources. Used to light the general area they are placed without a specific direction.
A reverse view shows the model build and lack of any detail behind the 'camera lens' (red).
A cross-section of the build shows how the entire set was encased to remove any 'outside' light that may affect the interior space.
RENDERING
So the first render was literally to see what would happen before I turned on any lights. The main source of light came from 'outside' the set before I had taken the time to box everything in as described above.
It's pretty dark at this point, so lets turn on the lights.
The huge bars of light that go around the opening I set with 'intensity' turned on but for the vertical light panels on the side and blue glow from the elevator I turned on to something like '10' to see what would happen. As you can see it's a total blow out of light. Too much from that outside spot light (something daft like '64'). All way too much but a starting point. Now to pull it back.
This was better. the vertical lights I dropped down to '6' I think and the outside spot light went down too '44' and was moved back a tad. It was at this point I realised the outside space was affecting the set as well and so I blocked it in with a black box to resemble space. Playing with lights and numbers proved helpful when I purposefully started with too much as it gave me something to work back to rather than say starting at lighting strength '1' and going up from there. It would have taken too long.
Now I'm not a 3D modeller (hence my use of SketchUp). I'm not sure I could call myself a 3D generalist either. For what I do and my process. This (half a days work so far) is enough to work with in concepting up. There is a general feel of the correct light levels beginning to come through and once brought in to Photoshop I would be able to make minor level adjustments much quicker than inside the model. Again, the idea of this test was to practice lighting a space (in this case a very large one).
With a very quick drop in of the background and a little adjustment you can see the beginnings of a set being concepted with a strong light source that is effective and realistic enough to work with...
Thursday, 28 December 2017
Latest piece for project XPL0R3
Last design work of the year I imagine. More for my personal project "XPL0R3". Interiors for observation deck and main bridge will follow (at some point...). It's been a huge build. #sketchup #keyshot #photoshop Happy 2018!
Check it out on a full sreen here
Monday, 10 July 2017
Drone tanks
Finally some new stuff. Been sat on this for ages trying to find time to finish it.
I took a sketch I liked from my #20sevINKteen series and had previously mentioned in a tweet I was going to take it further so I did.
This was the result of some SketchUp and Photoshop
I took a sketch I liked from my #20sevINKteen series and had previously mentioned in a tweet I was going to take it further so I did.
This was the result of some SketchUp and Photoshop
Labels:
3Dmodel,
concept art,
concept design,
design,
keyshot,
podium,
sketchup,
tank,
vehicle,
war,
world war two,
ww2
Wednesday, 17 May 2017
Tuesday, 16 May 2017
Friday, 31 March 2017
Samsung. Sam-same?
So while I watched the Samsung S8 launch video I figured I'd have a bit of fun and design my own next gen mobile
Friday, 23 December 2016
A late and unfortunate post
Pretty much likely to be the last piece of work I'll do before CHristmas at this point. Was a Star Wars related concept design for myself. And then I found out Carrie Fisher had suffered a likely heart attack :(
Hoping for a recovery from everyones favourite princess...
"to me, she's royalty" Lor San Tekka, Ep7 The Force Awakens
Hoping for a recovery from everyones favourite princess...
"to me, she's royalty" Lor San Tekka, Ep7 The Force Awakens
Wednesday, 21 December 2016
Wednesday, 16 November 2016
Development process
So I originally really liked one of my Inktober doodles of a jeep type vehicle. Here it is below as a reminder...
First stop was to convert this vehicle into a 3D model. Dragged out some approximate lines to follow in SketchUp and started to knock the body together. Kept it at a relative scale incase detailing went as far as correct texture placement but ultimately (at this point in time) it hasn't gone that far.
On previous models (X-Wing and Shirase Explorer) I used the opportunity to take my time and develop a model that was detailed further than it necessarily needed to be. It's been good practice in the past and helps me feel I could comfortably work on high end projects with this low-poly program. On this occasion the model only went as far as interior seats and hinged doors. The rest of the exterior was enough to work on top of post render. And as a bog standard output from Keyshot here is what it produced...
Now I could have, and still may do, take that rendered sheet and really work on it to a point that shows the finished concept but from here I wanted to throw it straight into an active scene so I set up a shot with other vehicles and rendered that out. Note the mid-air cars and bike. Something had to produce a smashy attack but until the last minute I really wasn't sure what it would be...
So I took that image which I rendered out with transparancy 'on' so that I could easily place buildings and sky in behind it and got to this final image. I always felt it was some form of military or police jeep but thought I'd put them up against something unusual.
First stop was to convert this vehicle into a 3D model. Dragged out some approximate lines to follow in SketchUp and started to knock the body together. Kept it at a relative scale incase detailing went as far as correct texture placement but ultimately (at this point in time) it hasn't gone that far.
On previous models (X-Wing and Shirase Explorer) I used the opportunity to take my time and develop a model that was detailed further than it necessarily needed to be. It's been good practice in the past and helps me feel I could comfortably work on high end projects with this low-poly program. On this occasion the model only went as far as interior seats and hinged doors. The rest of the exterior was enough to work on top of post render. And as a bog standard output from Keyshot here is what it produced...
Now I could have, and still may do, take that rendered sheet and really work on it to a point that shows the finished concept but from here I wanted to throw it straight into an active scene so I set up a shot with other vehicles and rendered that out. Note the mid-air cars and bike. Something had to produce a smashy attack but until the last minute I really wasn't sure what it would be...
So I took that image which I rendered out with transparancy 'on' so that I could easily place buildings and sky in behind it and got to this final image. I always felt it was some form of military or police jeep but thought I'd put them up against something unusual.
Wednesday, 2 November 2016
Model making 1.0
Well this might be my biggest post in a while...
So as some may know, Im a big fan of Nolan's Interstellar. Being a fan in this day and age usually leads to being able to display your fandom via merchandise but it is sadly lacking for this title (something I'm slightly surprised by given it's a WB/Paramount property. Batman/Star Trek anyone...).
And so through searching sites and general 'googling' of typical words I found a company by the name of Moebius Models that had managed to produce a scaled model of the Interstellar Ranger. A ship I happened to have been hoping would be on the merchandise list, it was great to see a company had taken on the creation of this vehicle at an affordable price and ideal scale for the average consumer to stick on a shelf somewhere.
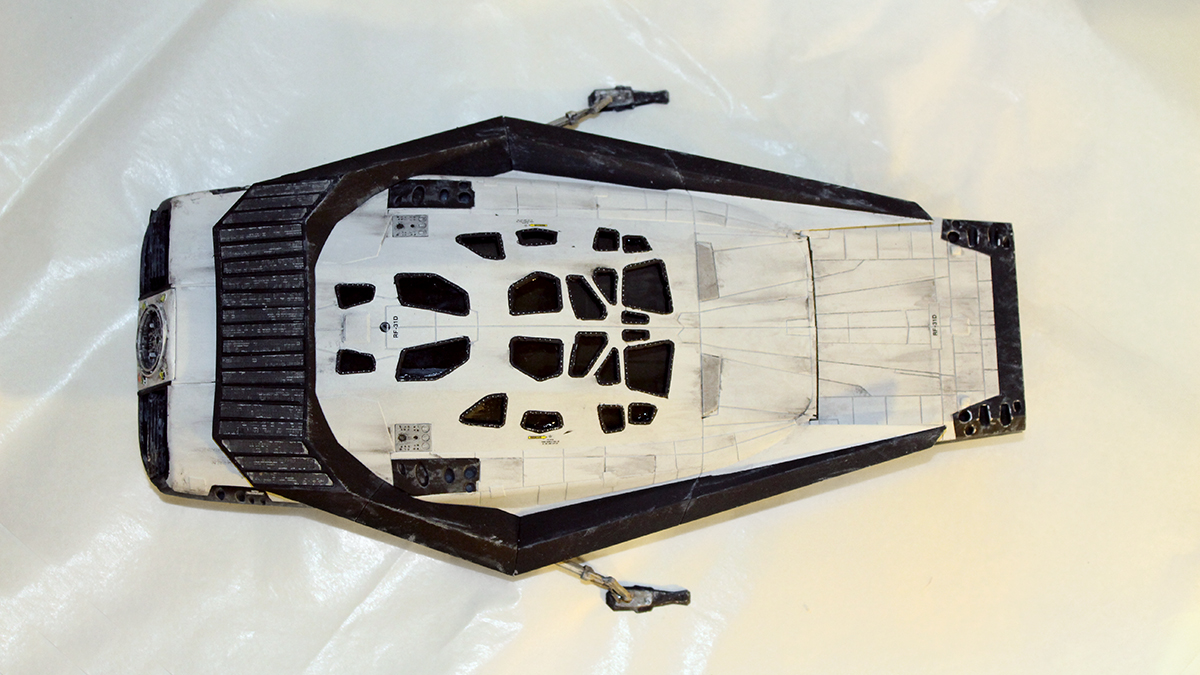
It comes in at around 10 inches long at a 1:72 scale of what would be the real vehicle. I won't get in to the nitty gritty of the build (unless someone wants to read about it) but it was my first ever go at miniature model making and I have to say I loved the whole experience. I can totally get behind people who enjoy building airfix kits. The hidden movie maker inside me saw this as an experiment to build a mniature that could also be used to film with also so maybe I'll do something down the line short of blowing it up...
Here are a bunch of photos that show off some of the stages of the build. I took my sweet time with it as it could probably be built in a day but I took a month doing bits here and there on the weekends.
As it was a first build, I didnt attempt to make an interior like some pros on youtube, instead opting for painting a top down interior in photoshop and printing it out as a flat graphic. Also a mini TARS stands inside it :)
Enjoy
TINTED WINDOWS GLUED IN
TOP PANELLING WITH SOME WEATHERING
WEATHERED VENTING ON UPPER SECTION
UNDERBELLY OF SHIP
EVIT DOOR AT REAR
METALLIC WEATHERED LIMBS
TARS AND INTERIOR PLAN
TARS AND INTERIOR FITTED ON BASE
FINAL BUILD
FINAL BUILD
FINAL BUILD
FINAL BUILD
FINAL BUILD
FINAL BUILD
So as some may know, Im a big fan of Nolan's Interstellar. Being a fan in this day and age usually leads to being able to display your fandom via merchandise but it is sadly lacking for this title (something I'm slightly surprised by given it's a WB/Paramount property. Batman/Star Trek anyone...).
And so through searching sites and general 'googling' of typical words I found a company by the name of Moebius Models that had managed to produce a scaled model of the Interstellar Ranger. A ship I happened to have been hoping would be on the merchandise list, it was great to see a company had taken on the creation of this vehicle at an affordable price and ideal scale for the average consumer to stick on a shelf somewhere.
It comes in at around 10 inches long at a 1:72 scale of what would be the real vehicle. I won't get in to the nitty gritty of the build (unless someone wants to read about it) but it was my first ever go at miniature model making and I have to say I loved the whole experience. I can totally get behind people who enjoy building airfix kits. The hidden movie maker inside me saw this as an experiment to build a mniature that could also be used to film with also so maybe I'll do something down the line short of blowing it up...
Here are a bunch of photos that show off some of the stages of the build. I took my sweet time with it as it could probably be built in a day but I took a month doing bits here and there on the weekends.
As it was a first build, I didnt attempt to make an interior like some pros on youtube, instead opting for painting a top down interior in photoshop and printing it out as a flat graphic. Also a mini TARS stands inside it :)
Enjoy
TINTED WINDOWS GLUED IN
TOP PANELLING WITH SOME WEATHERING
WEATHERED VENTING ON UPPER SECTION
UNDERBELLY OF SHIP
EVIT DOOR AT REAR
METALLIC WEATHERED LIMBS
TARS AND INTERIOR PLAN
TARS AND INTERIOR FITTED ON BASE
FINAL BUILD
FINAL BUILD
FINAL BUILD
FINAL BUILD
FINAL BUILD
FINAL BUILD
Subscribe to:
Posts (Atom)