So between projects (and partially becase of a current project) I felt I wanted to practice more with lighting within 3D space. As digital modelling isn't quite the same as switching on a normal light bulb, I wanted to play with settings to see if I could further grasp how to recreate a 'look' for my concept art.
My fundamental inspiration came from using a recognisable film frame and rereating a set rather than simply making something up and hoping it looked right. Also the first 20minutes of a great panel discussion with John Knoll at Star Wars Celebration 2016 gave a similar, more polished example of what I was thinking of.
So as you can see below, this is my current desktop wallpaper. A Star Destroyer hangar bay from Jedi I believe...
The first thing was to match the perspective and camera view which can be done pretty effectively using MatchPhoto in SketchUp. I began by blocking out the space that was visible. No point in building outside of the camera view. Let's be cost/time effective ;)
The red highlighted area is a note that I never intended on building outside of the hangar. It would be painted or photbashed in as a background element.
The foreground gantry really sits quite far back in terms of the shot but realistically you can recognise the forground element is actually shot footage on a matte.
Detail was never the intention with this practice build. I blocked in the notable forms and of course light sources. The Imperial Shuttle (below, red), I grabbed from the SU warehouse so kudos to the person who built it. Highlighted below in yellow is a very large spot light source (I should mention I was using Podium as my rendering software). The green scribbles are omni light sources. Used to light the general area they are placed without a specific direction.
A reverse view shows the model build and lack of any detail behind the 'camera lens' (red).
A cross-section of the build shows how the entire set was encased to remove any 'outside' light that may affect the interior space.
RENDERING
So the first render was literally to see what would happen before I turned on any lights. The main source of light came from 'outside' the set before I had taken the time to box everything in as described above.
It's pretty dark at this point, so lets turn on the lights.
The huge bars of light that go around the opening I set with 'intensity' turned on but for the vertical light panels on the side and blue glow from the elevator I turned on to something like '10' to see what would happen. As you can see it's a total blow out of light. Too much from that outside spot light (something daft like '64'). All way too much but a starting point. Now to pull it back.
This was better. the vertical lights I dropped down to '6' I think and the outside spot light went down too '44' and was moved back a tad. It was at this point I realised the outside space was affecting the set as well and so I blocked it in with a black box to resemble space. Playing with lights and numbers proved helpful when I purposefully started with too much as it gave me something to work back to rather than say starting at lighting strength '1' and going up from there. It would have taken too long.
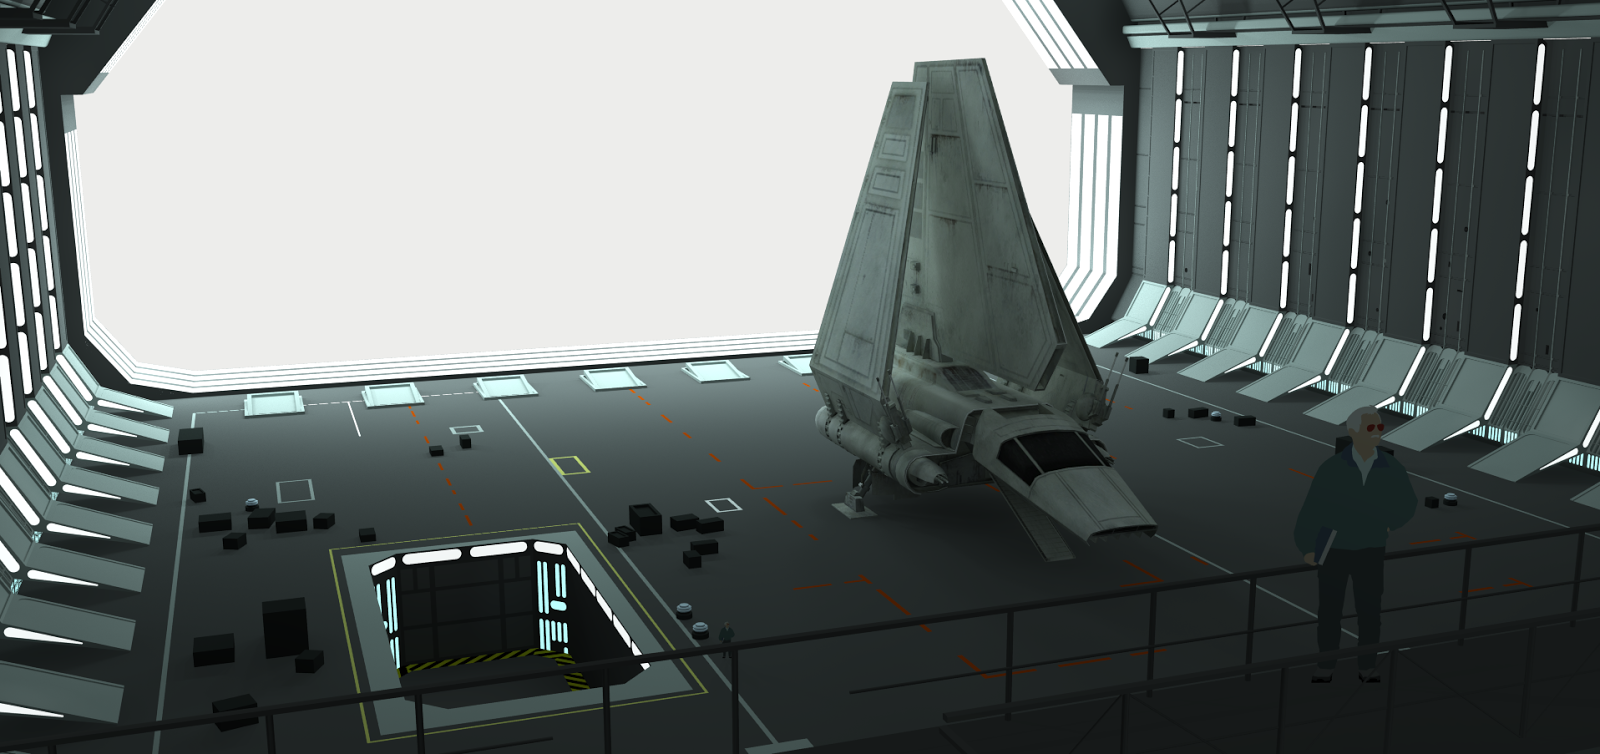
Now I'm not a 3D modeller (hence my use of SketchUp). I'm not sure I could call myself a 3D generalist either. For what I do and my process. This (half a days work so far) is enough to work with in concepting up. There is a general feel of the correct light levels beginning to come through and once brought in to Photoshop I would be able to make minor level adjustments much quicker than inside the model. Again, the idea of this test was to practice lighting a space (in this case a very large one).
With a very quick drop in of the background and a little adjustment you can see the beginnings of a set being concepted with a strong light source that is effective and realistic enough to work with...
Showing posts with label environment. Show all posts
Tuesday, 6 February 2018
Wednesday, 17 May 2017
Thursday, 26 January 2017
Wednesday, 16 November 2016
Development process
So I originally really liked one of my Inktober doodles of a jeep type vehicle. Here it is below as a reminder...
First stop was to convert this vehicle into a 3D model. Dragged out some approximate lines to follow in SketchUp and started to knock the body together. Kept it at a relative scale incase detailing went as far as correct texture placement but ultimately (at this point in time) it hasn't gone that far.
On previous models (X-Wing and Shirase Explorer) I used the opportunity to take my time and develop a model that was detailed further than it necessarily needed to be. It's been good practice in the past and helps me feel I could comfortably work on high end projects with this low-poly program. On this occasion the model only went as far as interior seats and hinged doors. The rest of the exterior was enough to work on top of post render. And as a bog standard output from Keyshot here is what it produced...
Now I could have, and still may do, take that rendered sheet and really work on it to a point that shows the finished concept but from here I wanted to throw it straight into an active scene so I set up a shot with other vehicles and rendered that out. Note the mid-air cars and bike. Something had to produce a smashy attack but until the last minute I really wasn't sure what it would be...
So I took that image which I rendered out with transparancy 'on' so that I could easily place buildings and sky in behind it and got to this final image. I always felt it was some form of military or police jeep but thought I'd put them up against something unusual.
First stop was to convert this vehicle into a 3D model. Dragged out some approximate lines to follow in SketchUp and started to knock the body together. Kept it at a relative scale incase detailing went as far as correct texture placement but ultimately (at this point in time) it hasn't gone that far.
On previous models (X-Wing and Shirase Explorer) I used the opportunity to take my time and develop a model that was detailed further than it necessarily needed to be. It's been good practice in the past and helps me feel I could comfortably work on high end projects with this low-poly program. On this occasion the model only went as far as interior seats and hinged doors. The rest of the exterior was enough to work on top of post render. And as a bog standard output from Keyshot here is what it produced...
Now I could have, and still may do, take that rendered sheet and really work on it to a point that shows the finished concept but from here I wanted to throw it straight into an active scene so I set up a shot with other vehicles and rendered that out. Note the mid-air cars and bike. Something had to produce a smashy attack but until the last minute I really wasn't sure what it would be...
So I took that image which I rendered out with transparancy 'on' so that I could easily place buildings and sky in behind it and got to this final image. I always felt it was some form of military or police jeep but thought I'd put them up against something unusual.
Thursday, 13 October 2016
Such a while
but Im back with a mini post. This is a raw render out from Podium using the Asset library. Came about because Podium is running a contest to create an interior so I thought I'd see what was doable with their free assets.
Currently doing Inktober so end of the month I'll post thos all up too...
Wednesday, 13 July 2016
project SPACE (soon to be renamed I imagine...)
So after a solid week and a bit of playing around with the model Ive put up the vehicle design. Lots of Sketchup and photoshop. Hope to develop the whole idea/world more in the future...
Tuesday, 29 March 2016
Conference room for a conflab
A set design thats a little more real world. Used sketchup to block out the important shapes and produce ortho views for what could be turned into better blueprints to build off of.
Wednesday, 16 March 2016
Thursday, 10 March 2016
Raiding the art after a long gap
With talk of a new Tomb Raider in the works, and the idea to do this a little while back, Ive finally put digital pen to paper and doodled up a visual.
An actress I'd love to see take on the role would be Alexandra Daddario. So I put her in there :)
Wednesday, 23 December 2015
Seasons Greetings
Merry Christmas time from me! Soon to come as always, my top 5 movies of the year 2015!!! Stay tuned...
Thursday, 20 August 2015
Monday, 17 August 2015
Fan art? Really?...
I really don't make a habit of this but at the moment for my own reasons, Ive needed to slip into the past and draw what I grew up loving. Little would I have known that doing this exact thing would be called 'Fan Art' back then and depending on who you talk to now, can have both positive and negative implications. None the less this is MY fan art. Its not official and its my interpretation. Enjoy :)
Wednesday, 12 August 2015
Thursday, 30 July 2015
Chase down
Lot of painting and textures in this. Felt I leveled up on this one haha lets see I keep it at that level next time
Wednesday, 29 July 2015
Tuesday, 21 July 2015
Friday, 17 July 2015
Monday, 13 July 2015
Light weight speed racer
Light weight sci-fi speeder. Practice pushing curves in Sketchup. Not easy and a pain at times.
Second image just a quick play with layers as a test and then the final pic. Happy with the final at least
Thursday, 9 July 2015
Subscribe to:
Posts (Atom)


